

Pull Apart Bread
I have friends who have never made homemade bread or rolls because the idea of working with yeast scares them to death! They love a fresh loaf of bread or pan of rolls right out of the oven but the thought of having to work with yeast stops them in their tracks. Is that you or someone you know?
Well, if you are that person or you know that person, today’s recipe is for you or them so please share. Now everyone can enjoy a fresh batch of homemade yeast rolls. I promise. Not only are these yeast rolls but they are covered in butter, garlic and cheese. Who could resist!? Yeah, butter, garlic, cheese and fresh baked rolls. Heaven. Today I’ve got step by step instructions on how to create the most amazing, garlicy, cheesy, gooey yeast rolls you could ask for. The best part? They use frozen roll dough. Yeap – frozen! Everyone can do this.
The steps are easy!
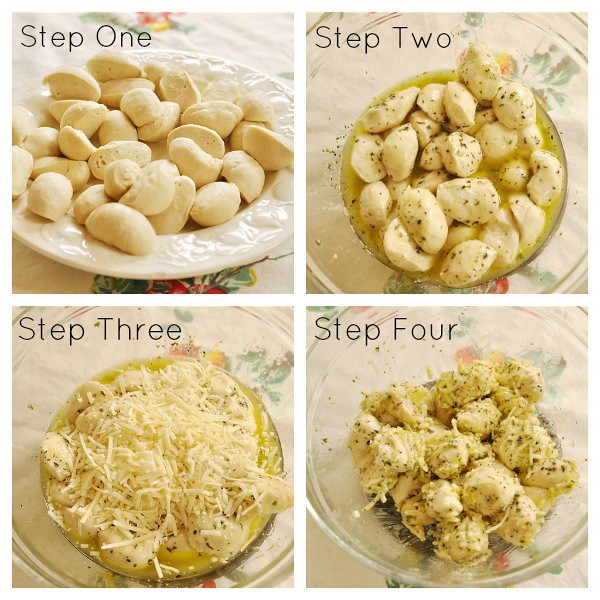 Step One: After allowing the frozen dough to sit at room temperature for 45 minutes cut each roll in half with a clean pair of scissors. Step Two: Pour melted butter and seasonings over dough Step Three: Add Parmesan cheese Step Four: Use your hands to gently combine and coat dough. Dough will stick together.
 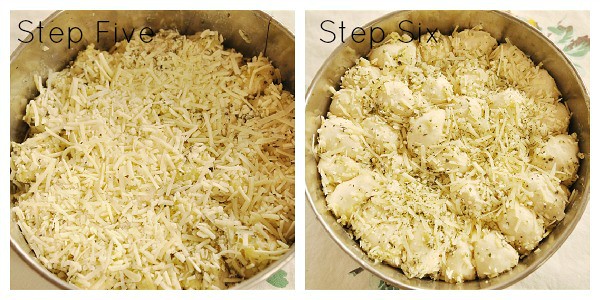 Step Five: Gently pull piece of dough apart and line the bottom of a 9 inch spring form pan with dough and cover with remaining grated cheese. Step Six: Allow to sit at room temperature and rise until double – about 1 1/2 hours. It is now ready to bake!! You will want to either place a cookie sheet under it or line the bottom of the pan with foil as the butter may leak out from the spring form pan while baking and make a big mess in the bottom of your oven, causing your smoke detector to go off and your alarm company to call and see if your house is on fire! Then it comes out of your oven looking like this!
 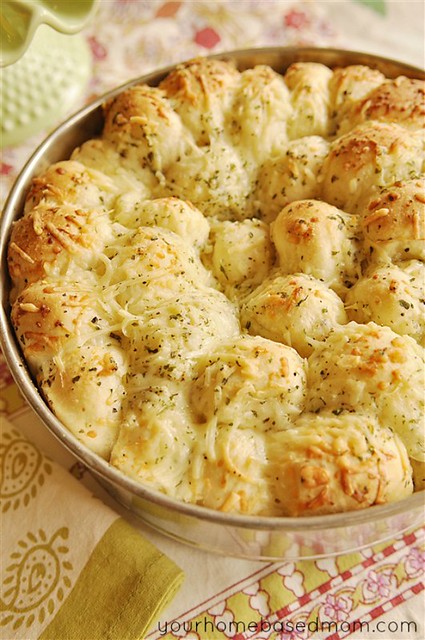 Ooey, gooey and full of garlic.
 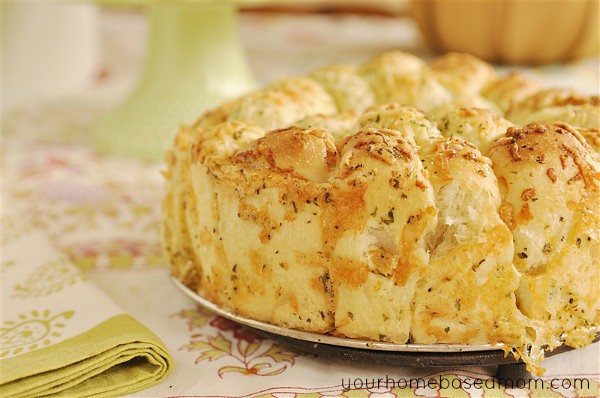 The next step is to eat and enjoy. Just grab a piece!
 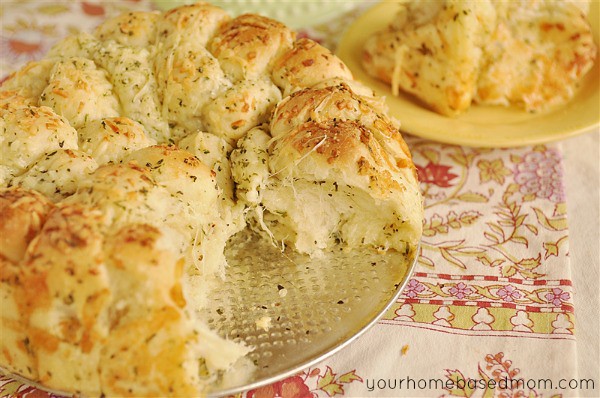 Recipe adapted from Melissa’s Southern Style Kitchen
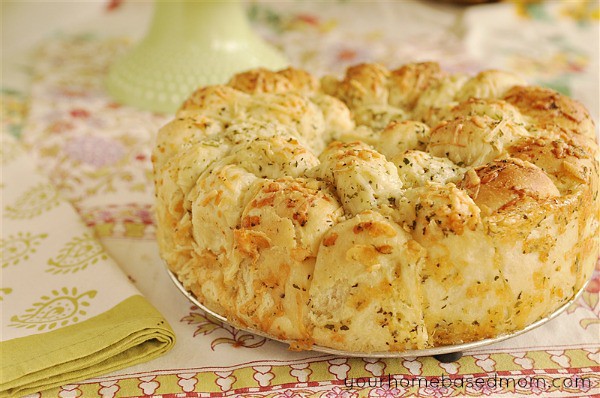
Garlic Cheese Pull Apart Bread

Garlic Cheese Pull Apart Bread
Ingredients
- 16 frozen white dinner rolls (Rhodes brand)
- ½ c butter melted
- 1 c grated Parmesan cheese divided
- 1 tsp dry parsley flakes
- 1 ½ tsp garlic powder
- ½ tsp salt
- ½ tsp Italian seasoning
- ½ tsp onion powder
Instructions
- Remove frozen rolls from freezer and loosely wrap them in plastic wrap and allow to sit at room temperature for 45 minutes.
- Cut rolls in half with a clean pair of scissors.
- Combine melted butter and seasonings together.
- Pour over dough and gently mix.
- Add ½ c of grated cheese and combine. You want each piece of dough to be coated.
- Line the bottom of a 9 inch springform pan with the pieces of dough and then top with remaining grated cheese.
- Allow to rise in a warm place for 1 ½ - 2 ½ hours.
- Cover bottom of pan with foil to prevent butter from leaking out.
- Bake at 350 for 20-25 minutes or until center is completely done.
Nutrition
Other bread recipes
Chocolate Chip Sour Cream Banana Bread
Banana Bread- with or without nuts
Zucchini Bread with Brown Sugar Topping
Quick French Bread


wooooow leigh.. it looooks so damn delicious.. id love to bake them one of these days.. unfortunately we dont have frozen dough in our small town.. but hey! looks so tempting that by just looking at it, it feels like it melts in my mouth…
This is one of my favorite recipes. I’m making it now and have made it numerous times. Everyone loves it. I have to make 2 batches if we have company and rarely have leftovers. Thank you so much for sharing it.
So glad it is a favorite!
Do you have to use a springform pan
I made these last night for dinner, and they were amazing!! I used a 9 inch round disposable aluminum pan, and only a sprinkle of parm on top. Once it was baked and cooled a bit, I scored the top into squares and stuffed shredded mozzerella cheese into the cuts. Covered it with tin foil and put in back into the oven until it was melted.
HEAVEN!!
Forgot to add that I used homemade pizza dough instead of ready made dinner rolls
Hi! I want to make these for my brother and his wife who just had a baby. I saw a comment about whether or not this would work making ahead of time.
Anyone try that?
Also, the recipe calls for grated but the pictures show shredded parm. What works best?
I bet you could get by with half the butter too…they seem greasy.
Just did it! Viola!
OK…I think they are super salty. Next time I will not use any additional salt, and may use unsalted butter. One cup of Parmesan makes them PLENTY salty.
I too struggled with having the center not be done. Having read about it, I was watching. After the 20 min mark, I covered with foil as the edges were getting brown and the center was raw. At the 25 min mark, I dropped the oven down to 300 and added 10 min…then 10 more, then left them in the pan because the instructions do not say weather or not to remove them from the pan now or later, or on a rack or what.
They seem done, but as they cooled the center sunk…like half the size of the outer edge. That doesn’t effect the taste but sort of dampens the wow factor.
I also see no reason (since I had to borrow a spring form pan) not to use a 13×9 inch baking dish like I do for ordinary dinner rolls. I may see what that’s like next time…because there WILL be a next time :-)
I think I’ll also add dill and dehydrated, minced onion to the spice mix.
What a great idea. It’s just going to take some practice to figure out the magic of getting them evenly done.
These are rising as I write. So easy and I bet they will be fantastic.
Like some other commenters, I’ve had trouble before with cooking homemade dinner rolls with the inside not being done and the outside being too done. You have to monkey around with lowering temps, adjusting rack heights until you get it right for your own oven. They sure aren’t all the same. Or sometimes, when I know the middle needs more but the top/bottom/sides are where I want them, I turn off the oven and let the remaining heat help out the center by just leaving them in the oven as it cools.
I’ll be posting a link on my blog to this recipe on your blog. Usually I make my own WW bread, dill bread, lavender bread and dinner rolls, but ya know, there are times when it’s OK to use frozen roll dough…nobody’s gonna die…to me the simplicity of this recipe is more of an attraction than anything else…something I can do when I want to make something groovy but really don’t feel like doing the whole sha-bang.
Looking forward to trying it! Oh…wouldn’t dill be good in this!?
This looks SO delicious! Definitely trying it this week, thanks for the recipe!
I’m very pleased to find this web site. I need to to thank you for your time for this particularly wonderful read!!
I definitely really liked every part of it and i also have
you bookmarked to check out new information in your blog.
Also visit my website :: дача сад огород
Hi, i feel tjat i saw you visitd my weblog thuys i came to return the desire?.I am
tring to find issues tto improve my website!I asesume its ok to use some of your ideas!!
Haave a look at myy site: авангард интернет
This is reallky interesting, You’re a very skilled blogger.
I have joined your feed and look forward to seeking more of your wonderful post.
Also, I have shared yoir site iin myy social networks!
Alsoo visit mmy web site; Реклама Коми (Priscilla)
I can’t wait to try this! Especially since we are in the midst of a Nor’easter in NH. Cold.
I love your recipes. You post the most yummiest recipes ever. I would love for you to just keep posting them. And the weather here in New Orleans isn’t all that bad. It’s cool and a little rainy. But from what I’m hearing on the news about the weather in the rest of the Country, with it’s below 10 and all, I think we’re pretty lucky.
Made this as part of the appetizer portion of our Christmas meal for 25….it was DELICIOUS!!! I had to use a different brand of rolls because they don’t sell Rhodes near me but the results were fantastic!!
Hi!
I work with a free app called SteerList (the to do list app that uses location-based notifications to remind you of your list as you go) and we liked this recipe so much that we featured it on our “A Delicious and Stunning SteerList Thanksgiving” blog, along with some other recipes from other bloggers to make a full meal. We’ve included links to the recipe itself (embedded in the article), as well as your blog to ensure you get full credit for the recipe and photo we used. If you notice something is wrong or you would prefer not to be featured, then just let us know and we’ll fix it or remove you from our post.
Here it is if you’d like to give it a look!
http://steerlist.wordpress.com/2013/11/22/a-delicious-and-stunning-steerlist-thanksgiving-feast/
Just wanted to let you know!
~Ann
I am making this for dinner as we speak. It was super simple and I expect it will amazing amd my family of four will devour it. My husband is a known cheese monger! Lol
I made these for dinner last night. My family loved it! Great bread.
Found this recipe on Pinterest last week, thank you! I made these today, for Sunday Football! They are amazing dipped in warm Marinara!! I added some chopped garlic because we are all garlic lovers in this house. Super Yummy.
So glad they were a success. Bet they were amazing in marinara! Yum!
do i have to use yeast??
If you want the dough to rise you do.
I made the bread for my family tonight and it was a smash for sure. Thanks for that! I’ll give you a thumbs up for this one. :)
Easy instructions and great recipe.
So glad it was a success!!
This is my 2nd time in 3 days making this. So good!!!
So glad it has become a family favorite!
OMG. I have these in the oven and currently my smoke detectors are all going off. I came running downstairs, saw the mess in the bottom of eye oven and got on here to say that someone was an idiot for the springform pan thing. Then took a closer look at directions and IM the idiot! LOL. So if you make this, DON’T FORGET THE FOIL!!!!! ;)
Yes, the foil is kind of important :)
This looks delicious! I really want to try it but I don’t have a springform pan or a bundt pan. Could I use a round cake pan? Or would that not really work? Thanks!
Sorry for the delay in responding to your comment. The problem with a round cake pan is that the sides aren’t high enough for when the dough rises, and layering the dough.
Is this something I could make the night before, refrigerate, and bake the next day?
I have never tried that before Kate. I would be curious to see how it worked and how much the dough would rise in the refrigerator. Let me know if you try it!
That looks yummy
OH my that looks delish! Can I come for dinner? ;)
Handmade at Warratahstree
Could you use Pillsbery biscuits instead?
You could give it a try – the only thing is the biscuits won’t rise like the dough will.
Let me know how it works!
Best recipe ever! I’ve had to make it 3 times in the last 4 days! Everyone devours it!
Wow! Thanks for showing exactly how to do this!
This is so easy and so good. I didn’t have frozen rolls on hand so I used 2 frozen bread loaves cut into 16 pieces each. The first time I made it I had some trouble like others did with it not being done in the center so the second time I made it I divided it into two 8″ round cake pans and baked it about 20 minutes. Perfection! And a pan to share with a friend! Thanks for the recipe.
This was delicious. I used fresh pizza dough and fresh garlic. Came out so good. Didn’t need to alter the time or temperature. But coating the bits in the butter needs to be done in two batches since the fresh dough sticks more easily.
Would love to make these – they look absolutely delicious! However, frozen bread rolls cant be found in Denmark, so what could I use instead? Do you have a recipe?
I would just use your favorite roll dough recipe and make your own.
If you don’t have a recipe you like you could try this one:
http://www.yourhomebasedmom.com/butter-rolls/
Questions: first, I made this and we loved it but…..no one in our house likes Parmesan cheese so I used mozzarella and it wasn’t very “cheesy.” Any thoughts on that? Second, I’d like to try this using fresh garlic instead of garlic powder – again, any thoughts on that? Thanks for this amazing recipe!!!!!
I think fresh garlic would be wonderful and as far as the cheese I would just experiment with the different types of cheeses your family likes – do they like romano? or pecorino?
leighanne, the same thing that happened to gina happened to me. The inside didnt cook, it is soft. What do I do? I want the whole thing both inside and outside to cook all the way through. Thank You. Shoot, your blog doesnt have the subscription button so could you please email me when you reply to this post? Thank You.
Would you recommend using salted or unsalted butter? I’m so excited to make these!
Maddie, I used salted butter
Would you recommend using salted or installed butter? I’m so excited to make this bread, it looks delicious!
I used salted butter
I made recipe exactly according to directions and steps but all the dough on the inside center of the spring pan was not even cooked, still just balls of dough ,halfway down and to the bottom. I even put it back in for 10 mins but then the tops started to get really dark so I took it back out. Inside still not done…. what did I do wrong? Loved the taste, we just ate the outside parts LOL any suggestions?
Your oven may bake a little hotter. Next time cover it with foil when you put it back in to prevent the top from getting too dark. You also might want to try it in a bundt pan instead of a springform pan for more even baking.
Good morning!! I’m so honored you re-made my recipe, and what a beautiful job you did! I’ve made this bread in all sorts of shapes, but, honestly, side by side in a springform pan is my most favorite. Can’t beat that crispy, golden crust! Thank you for mentioning the origin of my recipe, and giving me credit, too! ☺ Blessings ~ Melissa
Christy, bet it was pretty in a bundt pan! Glad you enjoyed it.
WOW….I forwarded this post to my mom and she made it yesterday while my brother was in town and it is….HEAVENLY !!! Soooo delicious. It was fun to watch it rise too. We didn’t have a spring pan but used a bundt pan and it worked great. We decided as a family that this recipe is going under that category of recipes that we allll love and will definitely make it again !! Thanks for sharing.
I tried these this weekend and they were so yummy! I filed the recipe in my favorites binder. I will be making them again soon. ..
Christi – Glad it was a keeper for you!
This looks amazing! I’m kind of scared to make it as I think I would finish off the whole pan!
Be scared!!
Not only is my mouth watering but it’s beautiful as well. I have bookmarked this to make!
Pamela, Thanks, pretty and delicious!
I’m going to make these for my oldest daughter. She loves anything cheese and bread!
Hope your daughter enjoys it as much as we did.
That looks delicious!
Thanks Heather!
These look delicious and easy to make! My hubby and kids love cheesy garlic bread, I think they will love it. Also seems like a great potluck dish.
This would be a great dish to take to a potluck so you don’t end up eating it all yourself!!
Don’t worry about the yeast! I use it all the time for bread rolls, buns, pizza dough… it’s super easy once you’ve tried it! I think I’m going to try this recipe with home-made dough – looks tasty!
Anja, I love working with yeast but a lot of people are scared of it. I agree with you that they shouldn’t be. I bet it will even yummier with homemade dough.
Oh my gosh, I love homemade bread. This recipe looks super yummy. I may have to make it when I have dinner guests, so I don’t overindulge. ;o)
You definitely should make it when you have dinner guests or you’ll end up eating the whole thing yourself. Believe me – I know!!