Hello friends! How is your summer going?
Ours has been WONDERFUL and I’m so happy it’s only half over. We’ll be making the most of these last 3 weeks of fun!
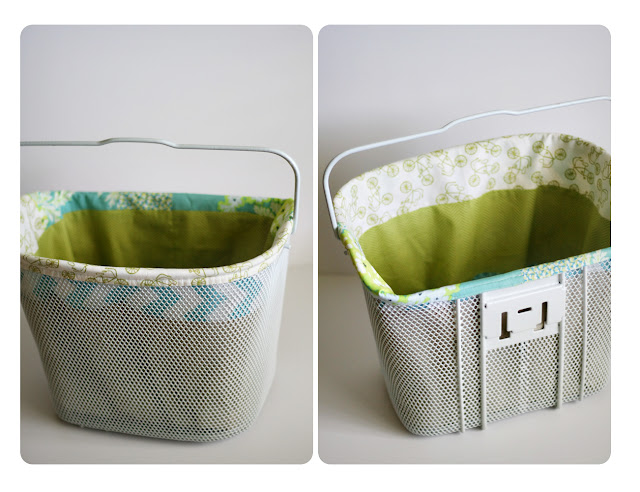
One thing we’ve been doing a lot of this summer is bike riding. My parents bought me a bike for my 35th birthday in May. Isn’t that the best? I felt 10 years old again! I was quick to add a basket, but the one I bought was more utilitarian than the ‘cute/charming’ look I was after. So, I added a basket liner and now it’s perfect.
I hesitate to call this a tutorial as I’m not going to share measurements and such but rather details of how I created my liner. Hopefully this will help you make one of your own, custom fit … for your bike basket, or any other basket in your home.
Materials used:
- Basket Inside fabric panel / 12.25×41″
- Outside fabric panel / 12.25×41″
- Base panel {X 2} / 7×8″
- 1/4 elastic / 41″
- Coordinating thread
For my liner, I wanted to use several prints from my stash in colors that matched my bike {lime green + aqua}. You could easily do one or two fabric{s} for the entire liner. This can be as simple as you’d like.
To determine my inside/outside panel dimension, I measured from the base of the basket to the tallest point {the front in my case at 10.75} and then I measured around the widest part of the basket {the top at 40}. Because the liner has to wrap over the top of the basket to stay in place, I added an extra 1/2″ to my 10.75 measurement making it 11.25. Then I added 1″ seam allowance {SA} to both of these numbers to come up with a final dimension of 12.25×41.
{Note: I didn’t have much room for my liner to wrap over the top due to the handle placement. If you have more room, I would recommend using 1/2″ – 1″ wide elastic to really hold your liner in place. In this case, you would need to add 1″ – 1.5″ to your height measurement for the wrap over.}
I created a pattern for the base piece by tracing around the basket base, folding in half and cutting a uniform template.
Cut {2} of the base pattern from your base fabric {linen}.
I chose to use several fabrics to create my inside fabric panel and topped my outside fabric panel {made from linen} with a chevron print as well. I just sewed the strips together and then cut to my needed size of 12.25×41.
** If your basket is even at the top, you can skip the next section.**
Fold your two panels in half width wise and iron a center crease. Match up two panels.
Because my basket is not straight along the top {it dips lower in the back} I needed to cut the top edge of my panels to match. This required a bit of measuring and a scrap paper to take notes ;). I measured the width of the front edge of the basket until it started to dip. I divided this # in half and made a pencil mark on my fabric measuring out from the center crease. I then measured the distance to the next dip and made a mark. I also took a new height measurement at each of these spots and marked it on the fabric {don’t forget to add in your 1″ SA}. I sketched a line and folded the two pieces of fabric in half, pinned and cut the line I had drawn.
Trust me, this was the most complicated step of the process.
Sew the two short edges of your inside panel {right sides} together and press open seam.
Repeat for outside panel.
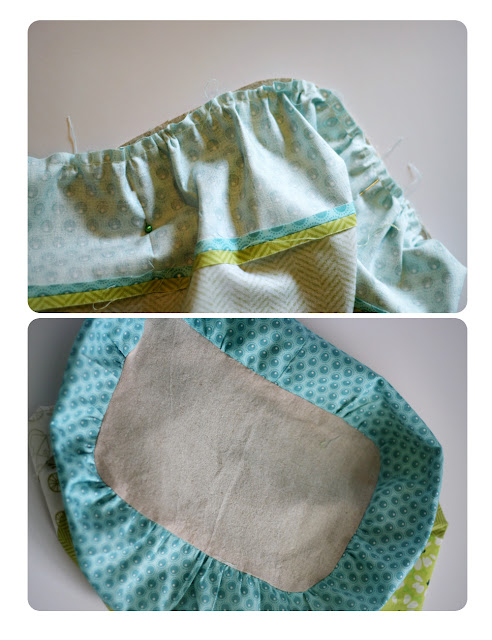
Because the base of the basket is smaller the the opening, you will need to gather the bottom edge to attach it to the base piece. Fold base piece in half {both width and length wise} and iron to divide into quarters. Divide panel into quarters width wise and iron. Sew a gathering stitch 1/4″ along the base of each panel. Match {right sides together} inside panel to one of the base pieces pinning at the 4 crease marks you ironed.
Pull the bobbin thread of the basting stitch and distribute the gathers until the panel matches up with the base. Pin in place and sew together using a 1/4″ SA. {Note: I gathered and pinned half of the base, sewed it together and then did then gathered and pinned the remaining half and finished sewing together.}
Repeat for the outside panel and second base piece.
Turn outside panel inside out and place the inside panel inside it, right sides together. Match up seams and top edge, pinning in place. Using a 1/4 SA sew the two pieces together along the top edge LEAVING a 2-3″ opening. Turn piece right side out through the opening you left. Taking your time, iron the top edge, using your fingers to make sure the seam is pushed all the way out.
Place your lining inside your basket, fold down the top casing edge and stretch the elastic {you’ll have more than you need} to get a nice snug fit. Mark and cut the elastic where it should be sewn together. Overlap the two ends and stitch together using a zig zag stitch. Close opening by top stitching the two edges together.
For more Knitty Bitties, you can find me rambling on my Blog; trying to keep connected on Facebook; tweeting on Twitter and most assuredly Pinning on Pinterest! Or check out my previous 30days posts here.


i’m back with a success story re the basket liner! I did it and it looks great!!! Wish you could see it. Thanks again for the tips:)
Dannette.C.
Australia
Thanks for sharing this. I have the same basket (minus the handle) and I’ve been having issues trying to make a liner. The one I just made is a giant mess. Yours looks great!!!
Adorable bike! The basket liner is cute – thanks for sharing how you did it.
Thank you! This was such a fun project and I’m happy to share!