

Just to recap, here are all the stitching tutorials we have gone over so far:
- the basics
- back stitch
- chain stitch
- stem stitch
I also shared this free snowflake embroidery pattern last time I was here.
Today I am going to go over the blanket stitch. It is a stitch commonly used to join two fabrics together (like on a blanket, hence the name) or for applique work. That is how I will be using it today, to make this adorable nursery wall art piece.
I made this for a friend who had a baby… four months ago. oops. I may not be on top of things, but when you do get a present from me you can be sure it will be a good one.
Let’s go over how I made this, from start to finish.

I have a very elaborate, fancy process for getting my letter shape for the applique, as you can tell. Instead of printing off a letter, I used Word, picked a font with an “m” I liked, and enlarged it to the appropriate size. I held the hoop up over my screen to gauge the size. Once I had it where I liked, I traced the letter and cut it out. Obviously you want to be very careful not to harm your screen while doing this. Why do this instead of printing the letter? To save black ink, of course. Or, in my case, because you don’t have black ink.

Flip your fancy template, trace onto felt, and cut it out. I am by no means a supply snob, but I do have a thing for 100% wool felt. For projects like this where you will be stitching over and over into the felt, you probably should go for 100% or some higher percentage (70-100%) of wool. It is sturdier and will stand up to the stitching. The acrylic felt from craft stores sold by the sheet for like $.25 just won’t hold up as well to all the needlework. Will it work? Probably, but it might not look as good. JoAnn does sell some higher quality felt on bolts in the fabric section, so you can start there if you don’t want to order online. Lots of Etsy sellers offer wool felt, but I buy mine from Papertrey Ink because of the fabulous color offerings.

To hold my letter stable while I stitch, I use a small amount of hot glue to hold it down. Only glue in the center of the letter because you will be stitching the perimeter and it is hard to get a needle through hardened hot glue.
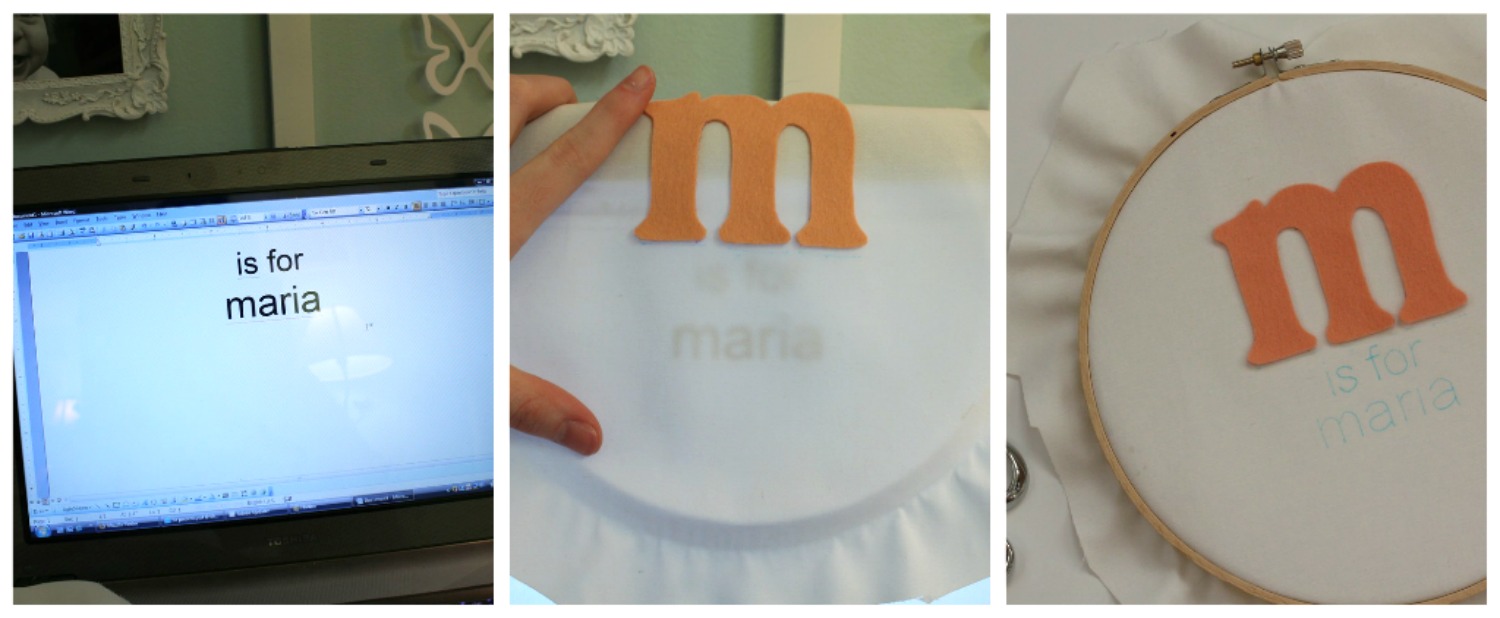
I use the same computer-as-a-pattern process for the rest of the lettering. This time I just traced my letters directly onto the fabric with a water soluble pen.
With the pattern all ready, it is time to blanket stitch.

1. Bring your thread up just on the outside of your letter and then put your needle into the felt a bit down and to the right of where you started your stitch.
2. Pull your thread almost all the way through, leaving a loop.
3. Bring your needle back up through the loop and pull through.
4. Once you pull your thread all the way through, you have your first stitch. It is kind of an “L” shape stitch.
Here is the process again.

When I run out of thread, I just end the stitch where I am at by inserting my needle directly on the other side of my last stitch and knotting it in the back.

To resume stitching, I bring my needle up where I just ended my last stitch and keep going.

Blanket stitch all around the perimeter of the letter and use a back stitch for the “is for maria” lettering.
At this point, all of your stitching should be done and it is time to add embellishments. I chose my colors based on this pretty vintage inspired fabric I have in my stash.
I made a yo-yo flower with the fabric and added a coordinating button. I free handed some tiny blue flowers, and also made felt rosettes.
To make the felt flowers, I used a ric-rac die to make a wavy piece of felt. If you don’t have this die, you can just out the wavy shape with scissors.
Roll up the piece of felt, hot gluing as you go. Hot glue and/or stitch all of your flowers on. For finishing the fabric in the back of the hoop, I just trim it down to about a half and inch from the outside of the hoop and hot glue inside the hoop very neatly. There are fancier ways to finish the back, but if you are careful and neat with your work it will still look nice.
I really really love this turned out. Proof that a few simple stitches along with pretty embellishments can have a big impact. I do believe it makes waiting four months for a gift worth it.


SO SO SO pretty…I just love how simple you made this! Nice work!
This is beautiful! I always have a problem getting started with blanket stitch and interestingly, I do my stitches from right to left – perhaps that is why I have a problem getting started, lol. Thanks for sharing your lovely creation.
What a clever idea, very creative as well… I making baby gifts to welcome my brother’s baby in May and this is a must !!! can I get more info about the ric-rac die cut and machine ??? I never come across one … Thank You
Super duper cute! I needed this motivation and must make a big effort to try something other than the over/under method. :)
Great tute. I’m impressed by how even your stitches turned out – I can tell you’ve had a lot of practice :) Will definitely implement your hot glue tip for my next applique project. Thanks for sharing.
This is sooooo beautiful! Wow, you are amazing! That stitching you did looks PERFECT! Thanks for sharing! :)
ADORABLE!!
I just spent an evening blanket stitching my ‘advent calendar’ shapes (star, heart, gingerbread man) that I started 3 years ago!! I had a handful of them that I had never finished stitching, but they are DONE!! :D
You’re rocking your guest posts and setting the bar a little high if you ask me … how can I compete!?! ;D
Haha! Don’t worry about me setting the bar… just set me in front of a sewing machine and I can do some damage – not in a good way : )
This is great. Thanks for the tutorial. I am getting back to embroidery after many many years! I am loving it!
I’ve never blanket stitched before, but it’s a stitch I’ve been wanting to try! Thanks for sharing. :)
Just found you via Momastery! Thanks for sharing can’t wait to see more!!
Victoria
Just amazing! Love it ~