
Hi there! My name is Kristi, from Creative Kristi and I’m excited to be joining the 30 Days contributor team. Once a month I’ll be handing out my best blog tips. This will be anything blogging related, including some DIY Your Blog Design tips. My hope is that I can empower you to know more about your blog and get a little hands on with it!
The number one thing I get asked on my own blog & in my graphic/blog design business is:
How do I create a code for my button?
Most people know how to use a photo editing program, such as Adobe Photoshop, or a free service, such as Gimp, to create an image (if that is something you’d like to learn more about feel free to check out the first video on this page of how to put together graphics using Gimp). But writing some html to get it to show up on your blog with a box beneath it for others to grab the code?
Well I think it scares some people and others are just baffled by the code.
I’m going to try to simplify it for you!
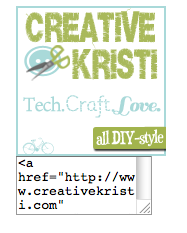
This is my button:
(feel free to grab it if you want!)
Now how did I get it to show that box?
Pretty simple (promise!).
First you should upload your photo/graphic to a service that will allow you to change the button without the url changing (totally not necessary but eliminates the need to ask your readers in the future to “grab my new button” if you ever have a redesign).
If you are self-hosted wordpress you can use your host’s ftp to upload an image. To make it easier to use the ftp I recommend downloading Filezilla and using that to log in.
If you are wordpress.com or blogger.com I recommend Photobucket.
All of these options upload the image with a url that doesn’t use the date in it. This is key because when you need to change it you can just create a new image and name it the same as your old image then delete the old image from either FTP or Photobucket and add the new one. Your button will auto-update on any site that has it displayed.
Oooo, ahhh, magic ;-)
Now onto the code.
You are basically adding your image twice but telling your blog to show the, usually hidden, html for the second one.
the html for showing an image is this:
IMAGE-URL-HERE”>
for a text link it is this:
URL-FOR-LINK-TO-GO-TO”>Text to show as the link
if you put them together you get an image that is linked to a specific url:
URL-FOR-LINK-TO-GO-TO”>URL-FOR-IMAGE”>
Now to write the code for showing the code below an image (did I lose you with that sentence? heehe).
Here is a picture of the code with the major places explained.
(The code you can copy & paste is below the image.)
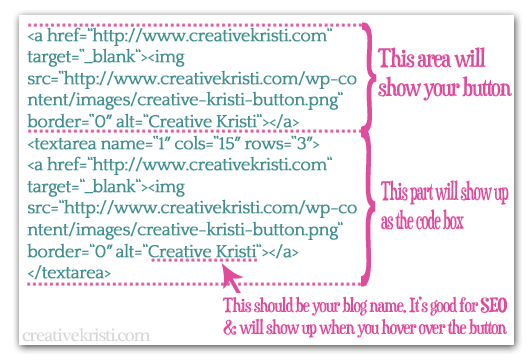
<a href=”http://www.creativekristi.com” target=”_blank”><img src=”http://www.creativekristi.com/wp-content/images/creative-kristi-button.png” alt=”Creative Kristi” border=”0″ /></a>
<textarea name=”1″ rows=”3″ cols=”15″><a href=”http://www.creativekristi.com” target=”_blank”><img src=”http://www.creativekristi.com/wp-content/images/creative-kristi-button.png” alt=”Creative Kristi” border=”0″ /></a></textarea>
So everywhere you see my URL you’ll want to change it to your url (2 places in the code) and be sure to change my image url to your image url (2 places in the code) and you’ll be all set.
If you do it right it should show up like this:
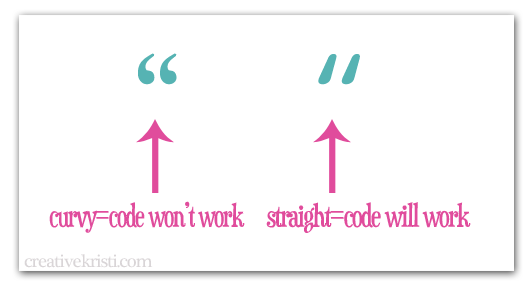
Trouble-shooting:
Sometimes when you copy & paste html the quotation marks change from straight up and down to curved. You want them to be straight-up and down for the code to work so go back through and re-type the quotation marks.
If you are trying to insert your button into a blog post (like I did above) for a linky party or some other reason make sure you write your entire post then click over to your html tab. Insert your code and publish. If you go back to the visual editor it will just show two buttons one on top of the other-it gets rid of the code for some reason.
I hope that this was helpful for understanding the basics of html code! If you have any questions feel free to email me or leave a comment!
Creative Kristi is a military wife from Maine with 2 children, 5 & 2. She creates affordable blog designs, drinks way to much coffee & tries to homeschool, craft, and discover new things each day. Join her on her blog, twitter, or facebook.


Hey there! I just wanted to ask if you ever have any problems with hackers?
My last bpog (wordpress)was hacked and I ended up losing several week of hard work due
to noo backup. Do you have any solutions to stop hackers?
Feel free to surf to my web blog :: car accident settlement
Leather dog collars are accessible in all manners of lengths and
sizes.Training collaars include everything from the interlocking
metal-ringed ones of the show ring to bark collars, tracking
collars, beeper collars, and other electronic varieties. Owners, however, caan take action in preventing the permanent loss of thedir dogs.
It is truly a great and useful piece of information. I’m glad that you shared this helpful info with us. Please stay us up to date like this. Thanks for sharing.
This tutorial was super easy to follow. Thanks a bunch.
I am designing buttons and they are available here:
http://www.vinslookbook.com/shop
Thank you so much for sharing this. I am always begging the girl who designed my blog for new buttons anytime I need one. Now, I can try to make them myself :)
SHannah, YAY! Let me know if you run into any problems! :) Can’t wait to see your first button!