Learn how to applique with this step by step tutorial from the amazing V & Co.
Today kicks off my {third} annual Funner in the Summer! I’m so super excited to have Vanessa from V & Co posting a how to applique tutorial- this time it’s a hand appliqued bag.
Don’t know Vanessa? (pretty sure you do!) She’s an amazing seamstress with an awesome blog. We bonded over San Diego, a real bean and cheese burrito and “noisemakers” (her word for kids- love it) with special challenges years ago and I adore her. She’s also *hilarious* and the kind of wife and mom I want to be when I grow up. And hello- she has her own fabric line!! I feel lucky she’ll even talk to me at this point.
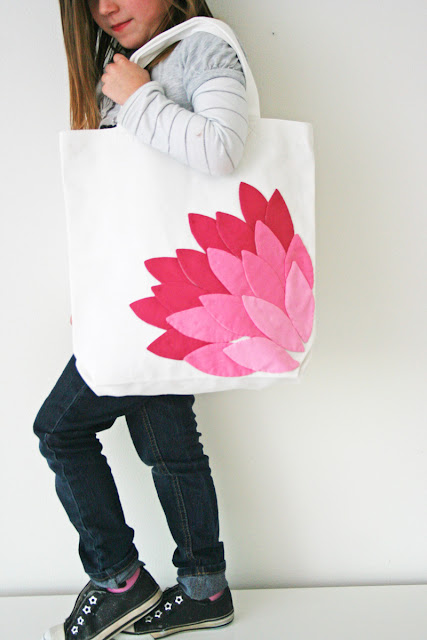
My daughter loves bags. kind of makes me proud. because i have a thing for bags too.
one thing this cute bag does is that it provides her with a big enough bag that she can carry whatever she wants in it: stuffed animals, baby dolls, wands, confiscated legos or star wars dollsaction figures, whatever the thing she wants to carry she can. and it’s kind of rock star. it’s also a great bag for the pool.
my original thought was to have it be her library bag, or her church bag, where she could bring her own special things that will help her keep her mouth shut occupied during the service. we tested it out this last sunday, and what do you know…she felt all kinds of grown up because she walked into church with her own over sized bag just like her mom. she even had the 7 year old noisemaker put his “occupier” in her bag before the service, brought it out for him, then got it back and put it in her bag when we moved into the sunday school part of it. yup, mother in training already i guess. :) and ahem, please note that a couple of petals were moved around after i had placed glue on them. this wont happen naturally, it just happened at my house, because said daughter decided to “help” after i had left the area. hence the wonky placed petal in the middle corner. :)oh well, it’s her’s right?
okay lets get started supplies needed: –light weight iron-on fusible interfacing(you can find it at most craft stores) -one 3 pack of canvas totes measured at 13.5″ x 13.5″ mine was found at walmart (see link) -thread for applique (find some at your quilt store. or you can try these suggestions: to get a good close enough shade to the two shades of lighter pink. and one shade closer to the darker hot pink)
–fabric fusion glue. (i found mine at Micheal’s) use that 40% off! this stuff is good and makes it permanent, and helps with the hand applique part of it. 
making the petals:
*i precut some of my fusible webbing in skinnier sections so it would be easier to trace my petals in sections for the different shades.-cut out your petal template and with a pencil trace on your fusible side (it will be a little shinier than the non fusible side) your petals. – do enough petals for each color (remember make a couple extras so you can play around and see how full you want it)
-place your fusible webbing (fusible side up) on top of your fabric.
-using your drawn lines as your guide, sew ON the petal lines. -do this for all your petals.
-cut out your petals (cut them close to the sewn seam, around 1/8″ out)
-once you have your cut out petals, gently pull your interfacing away from the fabric. -with scissors, cut a small long slit in the middle of the webbing.
-turn inside out, use a straight pin to pull out those pesky points.
-iron your petals. (the fusible webbing will adhere itself to the inside of the petal and give you crisp edges.
-start placing the lightest petals in your right hand bottom corner.
-grab the other shades and start fanning out your petals by placing them in between and slightly under the first set of petals. *notice that i played around with petals and started out with only 6 medium shade petals…
*and here it is with the 7 petals (that would of looked even better if little hands hadn’t move them. life with kids helps you to learn to say “oh well” or sometimes in like this case “i love my kids, i love my kids, i love my kids…maybe if i keep saying it, i wont forget it at this moment that i love my kids.”) *the good news is that the glue works so well that i was going to ruin the petal if i kept trying to pull it off. once you have your petals are where you want them, get your glue out. gluing your petals: starting with your darkest shade petals: –place some glue on the back of a petal (don’t lose your placement so just do one or two at a time) and lightly coat the back of the fusible webbing. (use a painting brush if you have one, if not your finger will be just fine too) *don’t overdo the glue, you don’t want it to seep through, because even though it’s invisible it will “show” and get kind of crusty hard on the fabric side after it dries if it seeps through. -continue to do this for each petal -once all of them are glued, walk away for a while till they dry.
okay once your petals are all dried… Appliqueing your petals: –if you’ve bound a quilt before then you know how to do invisible stitches. starting at the edge of the dark petals: – make your first stitch by bringing the needle up through the inside of the canvas bag, its tip emerging a tiny bit to the side of one of the petals. (i started with the outer most petals.) -insert the needle back into the canvas, right next to the place where it emerged.(NEXT to it not right through the same place) -only go about halfway down with your needle and bring it back up about 1/4″ from your first stitch. (the picture above shows what i am describing, just in a different part of the petals) *because you have glued your petals down first, you do not need to applique like you would if you were appliqueing a quilt block. (less than 1/4″ between stitches) the appliqueing on this project is more to make sure your edges don’t fold up when you wash your bag.-continue to applique around your outer petals. -for the middle section petals, because there are more layers, just applique through the petals underneath the petal you are appliqueing. there is no need to go through 4 layers of fabric and webbing and then canvas to applique, just make sure you make your stitches go through at least one layer under it to adhere it so it will now fold up when you wash it.
-now you have a totally awesome bag that cost you a little less than $5 to make and you can make two more in different shades of colors. i’m making one for me next…i’ll post pictures…when i get a moment to finish it. you know in between everything else i got going on. :)
this little girl loves it. and i love that she loves it.


Such a cool bag – trying to think of ways to re-work the concept for boys… :)
I honor your creativity. I hope your creation ‘ll must get popularity by this blog. So, i appreciate your idea. After all i wish your success. thanks for sharing.