

Learn how to paint cabinets with a little bit of money and a whole lot of elbow grease!
How to Paint Cabinets
A few years ago Bethany shared about painting kitchen cabinets. The transformation in her space was awesome! It was around the same time that we did our white kitchen remodel. Years later I’m still in love with my kitchen. It is everything I wanted in a kitchen. But we haven’t done a lot of other projects in our home.
Josh had some time in between taking the CA Bar Exam and getting the results (he passed- yay!!). I made a list of projects to do and at the top of that list was to paint all of our old cabinets white. As much as we would love to rip all of the cabinets out and replace them, that is a really pricey option. Even though Josh hadn’t done a lot of painting, he went all in and ended up painting ALL of the cabinets in our house white.
Painting Tips
Josh learned a lot of tips and tricks along the way, became friends with people at the hardware store and now is so much more confident in DIY projects. Also, the end results of painting the cabinets are amazing! It’s like night and day difference. I shared the whole journey on my Instagram stories and got lots of requests for a post.
Cabinet Paint
We have tried several different types of paint over the years. We used Behr for these projects and prefers them over other brands. Josh purchased our paint at Home Depot. Here is what he used:
- Premium White Interior Paint – Semi Gloss
- White Primer
Paint Supplies
All of the supplies below were purchased at Home Depot (with a few exceptions at Lowe’s for some hardware). I have linked them to Amazon and other suppliers so that you can shop from home and have everything delivered to your door!
- 180 or 220 sand paper blocks
- tack cloth
- Premium 2 inch paint brush
- 4 or 6 inch foam rollers
- 4 or 6 inch roller frame
- Rolling pan
- White Caulking
- Wash Cloths
Ok let’s get on with this!
Step 1 :
How to Remove Cabinets
Remove all cabinet doors and drawers from the cabinet framework.
- Label each door and drawer with masking tape and a marker to ensure that they are replaced to the correct spot when finished.
I took a video of each cabinet door and drawer properly labeled before removing them to ensure that there would be no confusion getting them back to their original position. - Remove and label all of the cabinet door and drawer hardware to ensure that it is returned to the same cabinet door or drawer when finished.
Because hinge settings and drill holes for each cabinet door/drawer will vary, it is imperative that each door and its hardware be reinstalled to its original position. - I used a dry erase marker to label each piece of hardware and a labeled solo cup for each cabinet/draw hardware set to store them in to eliminate the possibility of mixing them up
Step 2:
Paint Prep
- Set up a work area in a well ventilated area, preferably indoors to ensure that the painting process is free of wind and dust.
- Remove the marked tape from the cabinet door/drawer and place it on the work table where the piece will be painting.
- Clean each cabinet door, drawer and the framework with soap and water to ensure that any stains, grease marks or imperfections are removed.
- Using the sanding blocks, sand every wooden surface of the cabinets, drawers and cabinet frame.
If the cabinets are not painted and simply have a wood finish, treat the sanding block as if its a wash cloth and are wiping the wood down. You are simply trying to open the pours of the wood.
If the cabinets have been previously painted, you must start with rougher sanding grit to remove all of the prior paint before moving on. Otherwise you risk peeling. - Tape off the cabinet frame for priming and painting.
Step 3:
Priming
I used wax or parchment paper as a table cloth to protect the table and ensure that no painted surfaces would stick to the table.
- Using the 2 inch brush, apply a thick coat of primer to each drawer, cabinet Door (both sides) and cabinet frame. If the surfaces are flat, a foam roller may be used.
- Make sure to allow for ample dry time before priming the reverse side of each cabinet door.
- If the framework has a counter top, such as a desk or built in furniture, a second coat of primer is required.
- After the primer dries, you must inspect the surfaces for any pooling or run marks. Be sure to sand down any imperfections to ensure that they will not be visible after the paint process.
Step 4:
Painting
Using a 2 inch brush and/or a foam roller depending on the surface, apply a thick coat of Premium Semi Gloss Paint.
* Do no skimp on paint or paint brushes. This is not a place to go cheap.
- I started with the cabinet doors, and moved on to the drawers and framework while the cabinet doors dried. Once I finished applying the first coat of paint to the drawers and framework, the original cabinet doors were dry enough to turn over and paint the other side.
- After ample dry time (varies depending on the make and style of the paint), inspect each surface for run marks and pooling. The inspect and repair process will be the difference between great results and the “DIY look”. Take your time to sand or chisel away any imperfections.
- Apply a second coat of paint to all surfaces. Use additional care on the final coat, and use a foam roller when possible to avoid brush marks and other imperfections.
- After all surfaces receive a second coat and have dried sufficiently, inspect and repair any imperfections.
** I painted 8 built ins in our house and on about half of them, I felt the need for a 3rd coat. Much will depend on the type of paint and the thickness of each coat.
Step 5 :
Re – Install
Once the paint process is done, you can return the tape from the work table to the cabinet door/drawer to ensure each piece gets re-installed to the proper location.
Taking special care to ensure that each cabinet door/drawer is returned to its original spot in the framework, reinstall all pieces with the same original hardware.
Spot check each piece with room lighting and/or sunlight in the room. Feel free to touch up any areas that may need it.
Step 6:
Finish Work
Inspect the doors once more after installation. Look for imperfections.
* Twice I added an additional coat to some of the painted surfaces after reinstallation, because I didn’t realize the need until I saw it under different light. So fear not, its not too late, just take care when painting near the hardware.
Add any new door knobs or handles to the doors/cabinets.
You can also add caulking to where the furniture meets the wall. Even if its not necessary, it goes a long way in giving the finished product a clean look.
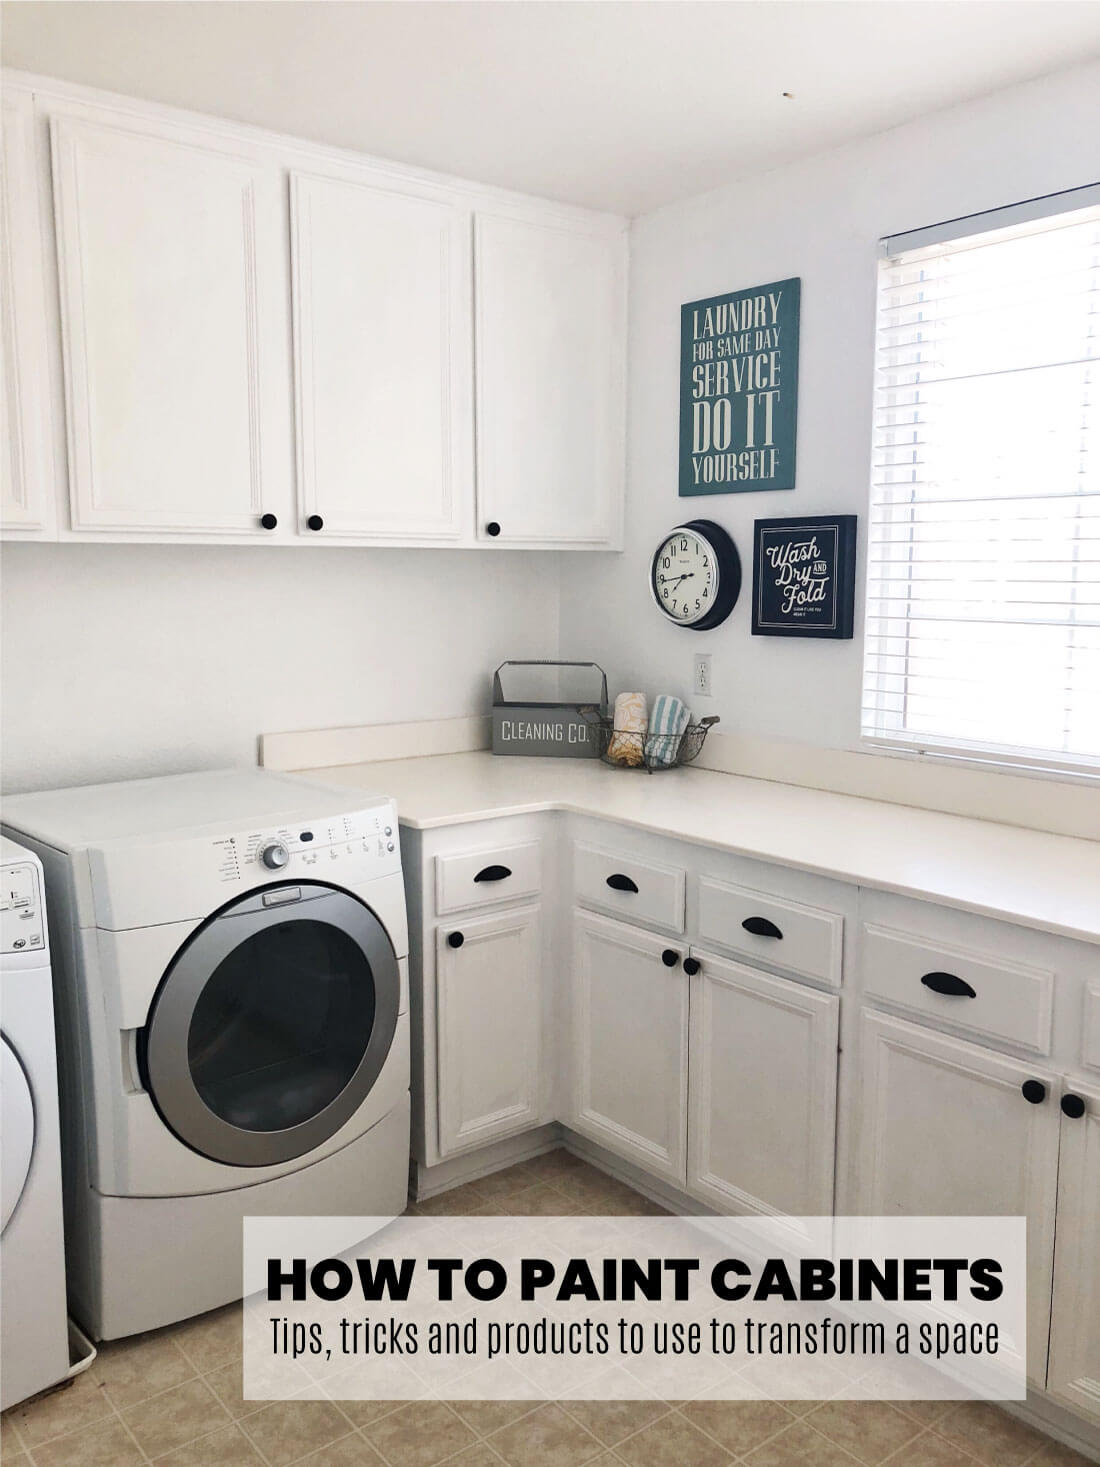
Here are some of the before and afters. They aren’t the best picture quality – I should’ve thought about taking pictures throughout the process. And I didn’t even get a shot of all of a before for all of our spaces. But hopefully you can see the drastic transformation in each space.
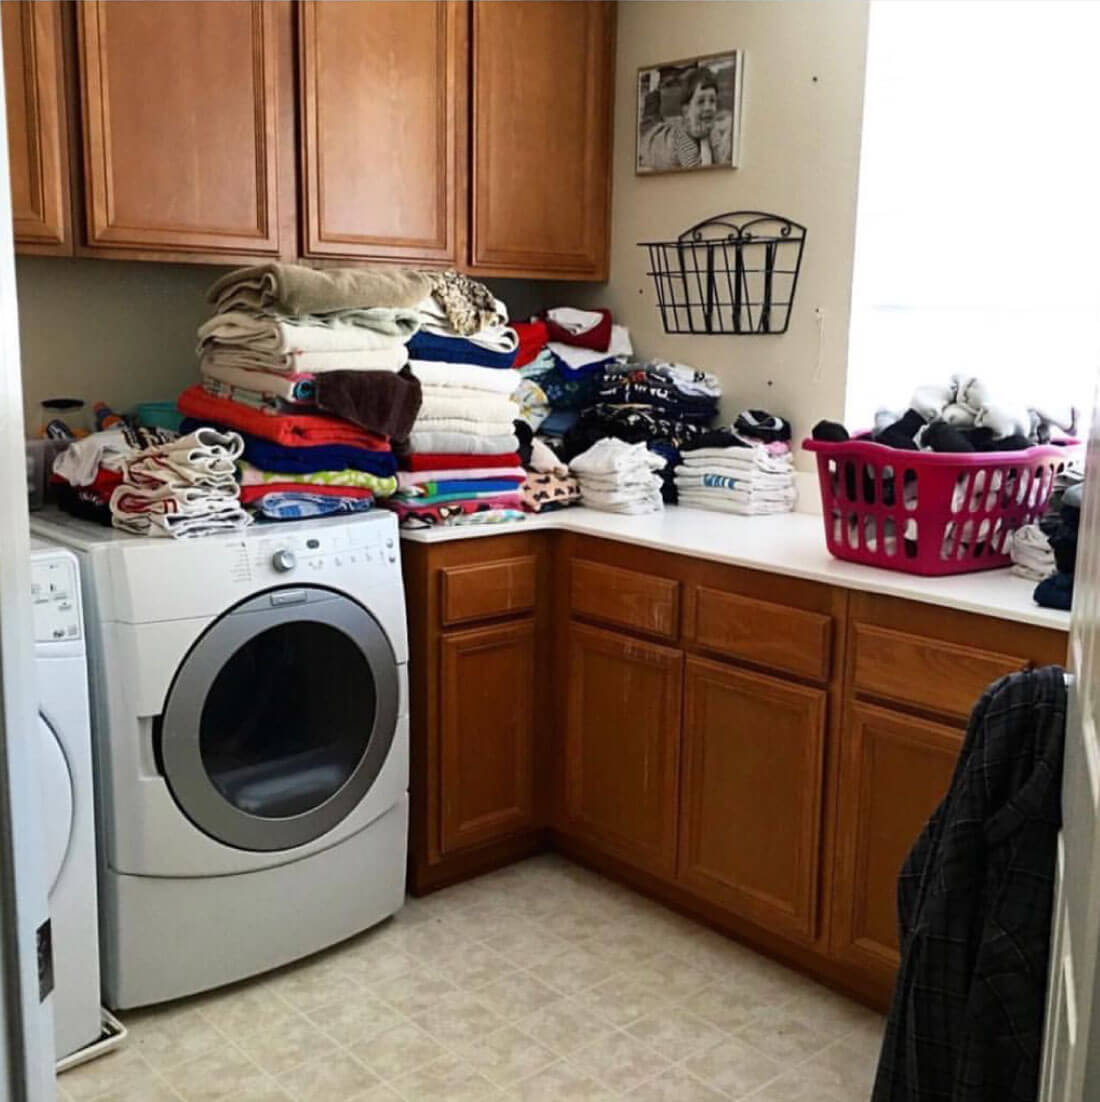
The laundry room is the one that started it all. We were going to film for the OxiClean commercial and wanted it to look nice. While I was out of town, Josh painted all of it. This was his first go at it, so he did it differently than he did as he learned more and time went on. It also took the longest to finish.
Products used for the laundry room:
Cabinet pulls and knobs, Lowe’s
Laundry sign and clock, Home Goods
Washcloths, Target
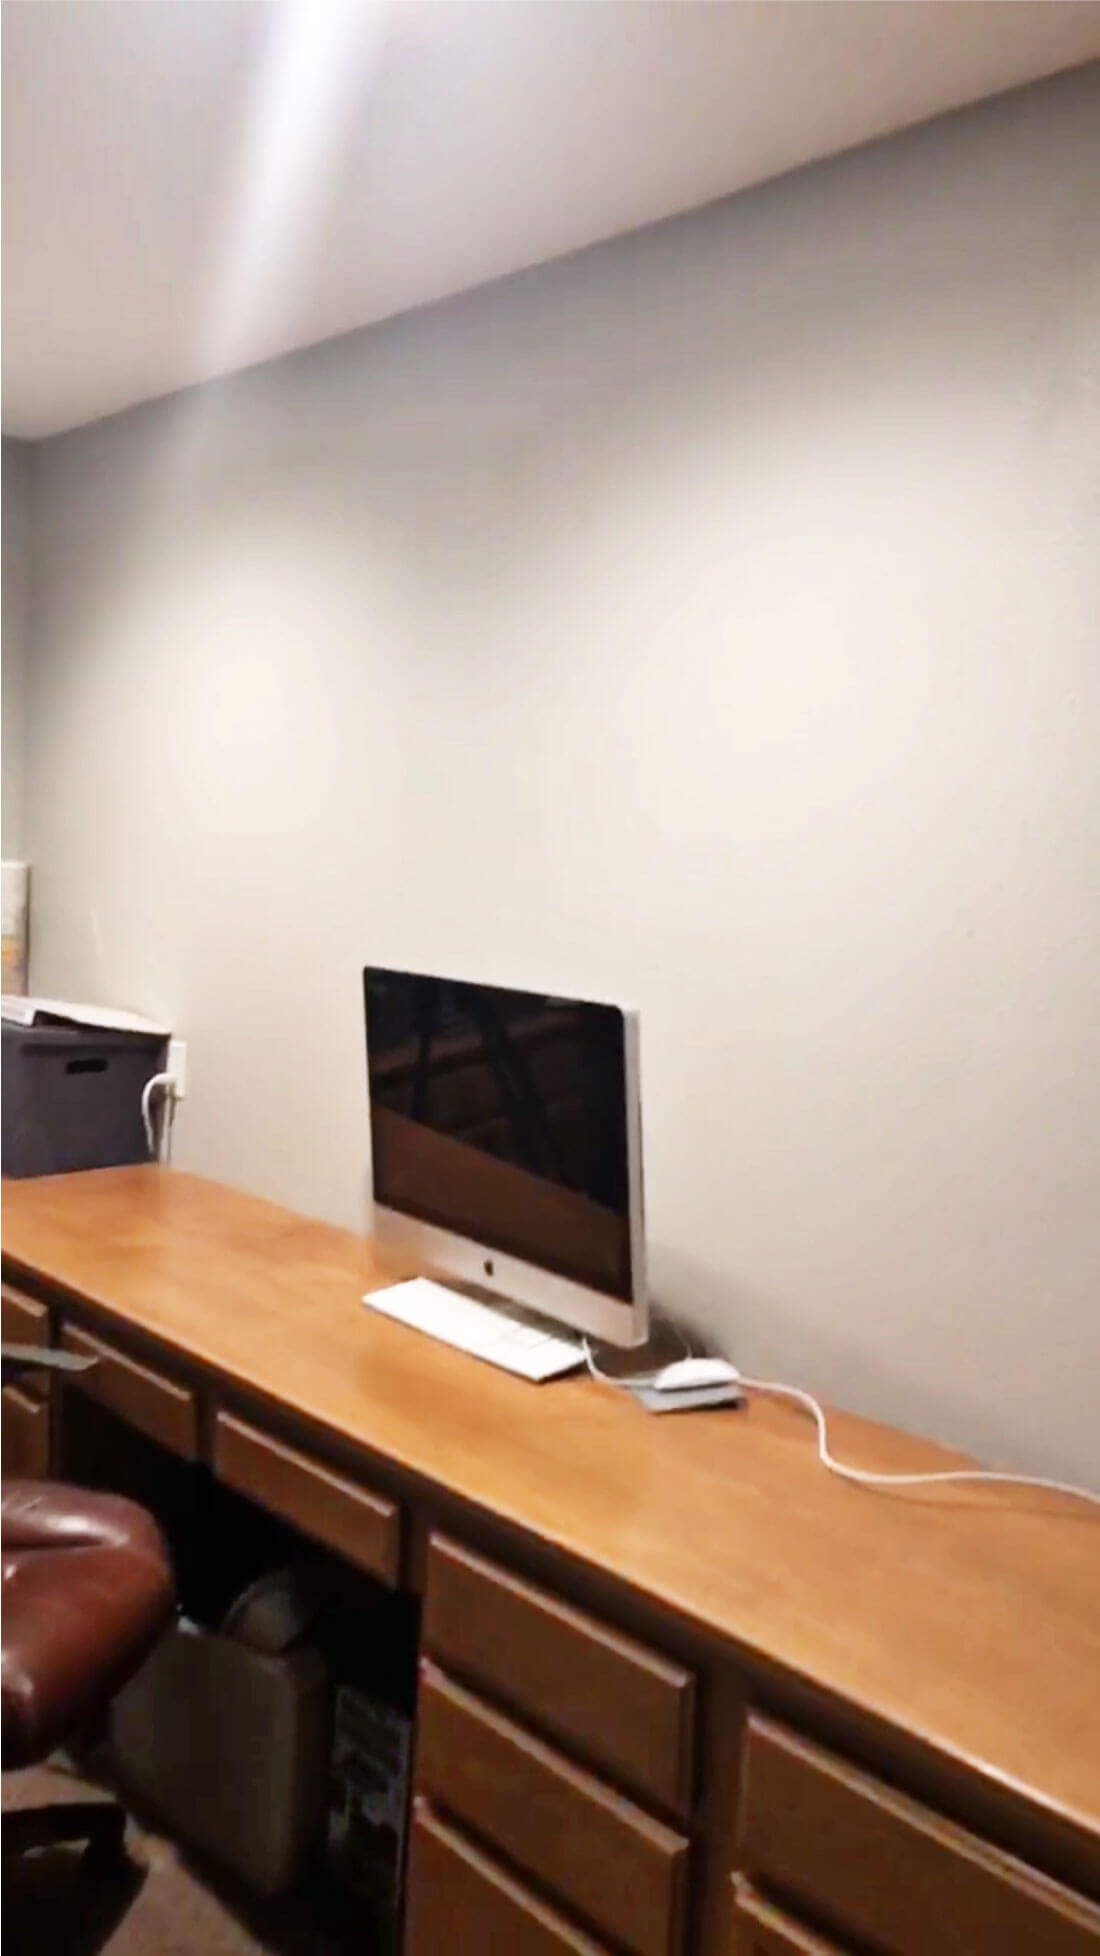
While I think all of the spaces look much better and updated, the landing at the top of our stairs is the most dramatic. I’ve always liked that we had the space but it’s been unused for so long. It ends up being our catch all for everything.
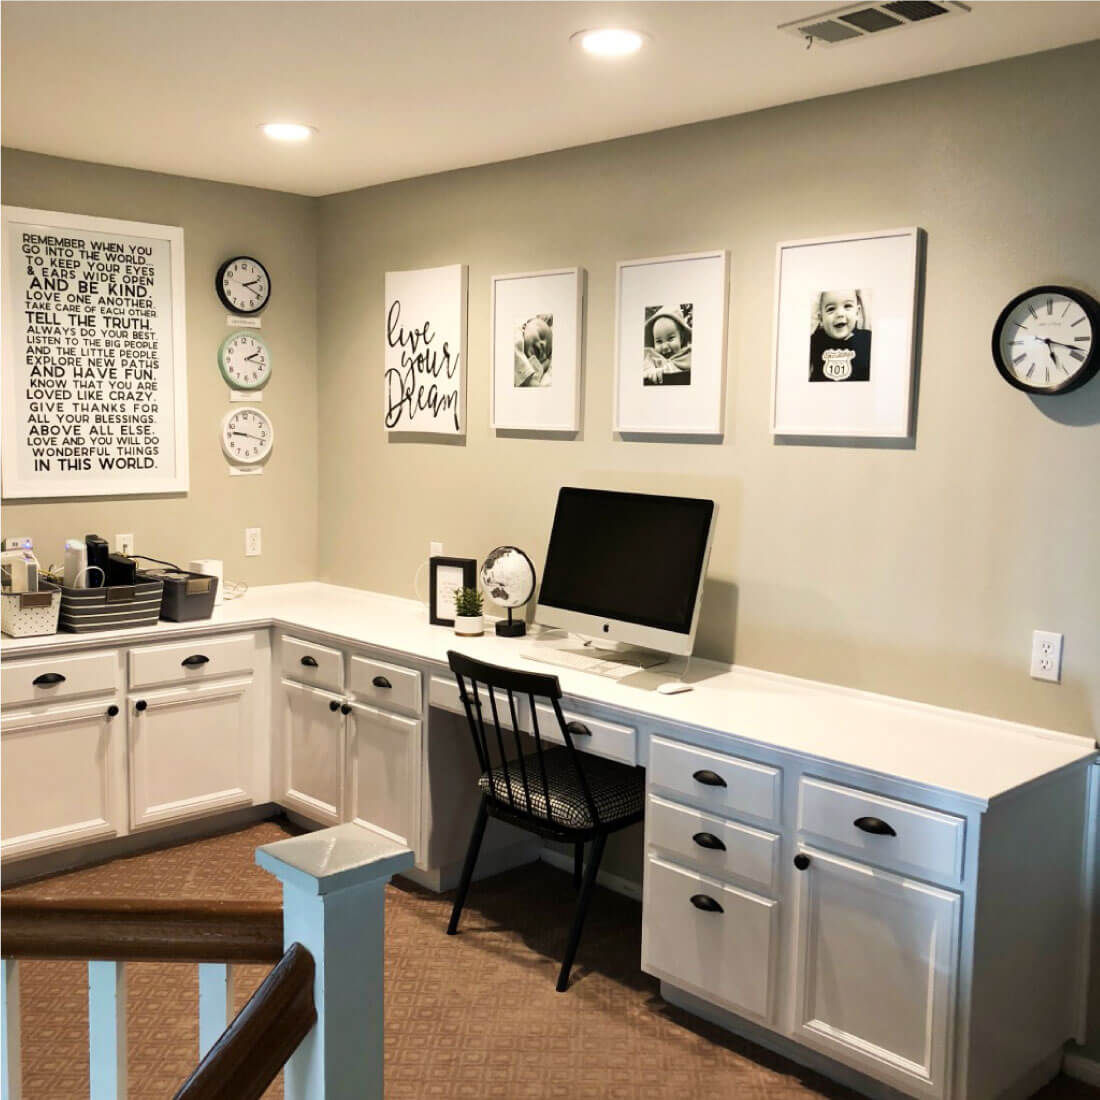
Now everything has is decorated, looks updated and has a spot. We’ll try hard to keep it looking nice and clean. I’m obsessed with the black and white.
Products used for our landing:
Cabinet pulls and knobs, Lowe’s (same as we used for the laundry room)
Metal black chair and pad, Target
Globe and clocks, Target
Frames and “Live Your Dream” art, Home Goods
Remember When Wall art, my shop – see more images here

Painting Bathroom Cabinets
Our master bath had the same ugly wood that the rest of the house had and we were so sick of it. We’d love to do a complete overhaul with a different layout, flooring and more. But it’s just not in our budget right now. So a couple days of paint and it’s so much brighter than it used to be.
Products used for the bathroom:
Cabinet pulls, Home Depot
Light fixture , Lowe’s
Cabinet knobs , Target
Have you ever painted your cabinets?


Do you do the insides of the cabinets as well or leave thenm as they are?
Thanks.
Nervous about starting but they must be done.
Yes! Good question. He did the insides as well. Otherwise when you open them, you’d see the old color. You can do it! ;)
This is a fabulous after!
Thank you so much Jenny!
How would you paint old cabinets that are pressed wood, with that plastic veneer over them? This place was built in that 70s & I’m SURE these cabinets have never been replaced.
Sand the veneer carefully to remove the plastic sheen. Don’t let people tell you it can’t be done.